Summary
This article explains ad hoc reporting and how to create or add a new report, edit an existing report, and execute a report.
Table of Contents
- Ad Hoc Reporting - Overview
- Create or Add a New Report
- Edit an Existing Report
- Set Up Report Forms and Filters
- Field Selection
- Adding Fields to a Report or Filter
- One-to-One Relationship
- One-to-Many Relationship
- Form Configuration – Know Your Forms and Relationships
- Execute an Existing Report
Ad Hoc Reporting - Overview
Ad hoc reporting is both simple and very powerful. Ad hoc reporting can be thought of as a powerful data mining tool. It can deliver granular data sets comprised of fields joined from multiple forms.
Users can produce simple listing reports with limited knowledge of the database. However, users with a basic understanding of the database can produce highly granular reports.
A report consists of a number of components. These include:
- Report Name
- Report Type
- Targeted Roles
- Included Forms
- Fields to Include in Report
- Fields to Filter Report
- Form Configuration
Create or Add a New Report

On the Ad-Hoc Reporting page, you will need to fill out the fields for your report.
- The first step is to name the report. The name can be any name with a maximum of 100 characters. The report name is displayed when the report is executed, so the name should be representative of the data in the report as closely as possible. The checkbox located below the Report Name text field, when checked, informs the system to "Use Label as Header (as opposed to field name)." This means the Field Label assigned to the field when the form was created in the Form Builder will be used instead of the field name (also assigned to the field when the form was created in the Form Builder).
- The report types are "Subject" or "Site." The report type selected from the drop-down list will determine which forms are available for the report.
- Check the Included Forms checkboxes to populate the forms wanted. The figure displayed below shows the Included Forms check-boxes when "Subject" is selected from the Report Type drop-down.
- Check the Available to the Following Roles checkboxes to choose which roles you want to have access to the report.
- To complete the setup of a new report, select Add New Report. All parameters must be completed or the save will not be successful. Once saved, the report will populate the Ad-Hoc Reports data table above the Add New Report form.

Edit an Existing Report
At the top of the Ad-Hoc Reporting page is the Ad-Hoc Reports data table, which contains all existing reports.
- To edit a report, click Edit in the desired row in the Ad-Hoc Reports data table.
- Depending upon the rights granted for the user role, you may not see the Setup, Edit, or Delete options. If the right to "Create or Setup a Report" has not been granted to your role, then Setup and Edit will not be displayed in the Ad-Hoc Reports data table.
- If the right to "Delete Report" has not been granted to your role, then you won't see the Delete option. Remember, if your role has been given the "Grant Access to Report Builder" right, you can execute a report.

After choosing Edit, you can edit the following fields:- Report Name
- Use Label as Header
- Exclude Admin sites
- Included Forms
- Roles
- Export Types
All become editable fields as shown in the figure below. By editing any of these fields, the user can change the information included in the report. This allows the user to enhance and improve their reports over time.
- When you are finished making edits, Update will save the changes you made, and Cancel will not save any of the changes.

Set Up Report Forms and Filters
After creating or adding a new report to the Ad-Hoc Reports data table, the report must be set up prior to executing the report. Setup is used to designate the report’s forms and filters. Remember, the forms that will be used in the report were selected when the report was created. Setup shows the system exactly how to use those forms for the report. To set up a report, click Setup on the corresponding row of the report.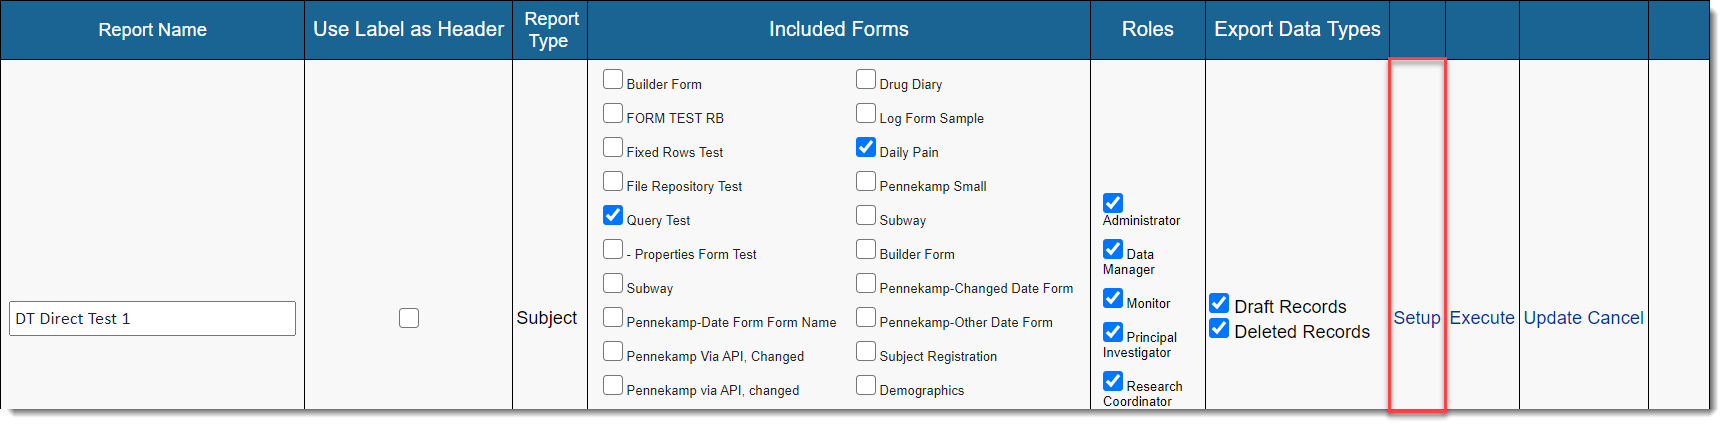
Selecting Setup will pull up the Report Setup page, which consists of two areas: field selection and form configuration.
Field Selection
This area of the page allows the user to select the fields to include in the report along with the fields to use as report filters. A report filter allows the user to select a subset of the data based on the field being filtered. You will learn more about filters in the “Execute a Report” section of this help page.
Each form that was included when the report was initially included will appear in the Form drop-down list. When the user selects a form from the drop-down list of forms, the fields that belong to that form will populate the Fields to Include In Report - Not Included list and the Fields to Include In Filter - Not Included list. To include fields, the user must move fields from the “Not Included” list box to the “Included” list box (explained in the following section).
Adding Fields to a Report or Filter
There are two sections for selecting fields to the report of a filter. Each section has two list boxes. To include a field, click on the desired field and then click the Add button. This moves the field from the “Not Included” list box to the “Included” list box. There are several ways to include fields as either column in a report or filters for that report:
- To select multiple consecutive fields, hold down the shift key and cursor down or up over the fields that are to be selected. When all desired fields are selected, click the Add button to add all the fields at once. By holding down the shift key, the user can highlight multiple fields by using any standard cursor movement including Home and End.
- To select multiple fields that are not listed consecutively, hold down the CTRL key and click each field with the left mouse button. This will select each field. Then click the Add button to add those fields at one time.
- To insert fields into the “Included” list box, highlight the field in the “Included” list box that the field should be inserted before. Next select the fields in the “Not Included” list box and click the Add button. This will insert those fields before the highlighted field in the “Included” list box.
Each field that is included in the report will appear as a separate column. Each field that is included in the Filter, will appear below the report and allow the user to filter the data by that field.
Some field names appear that are not defined in the form. These fields come from system tables and are automatically joined into the report and made available.
The figure below displays the output of a highly granular report. It highlights all of the key components of the report output.
Reports can join multiple forms. There are two types of joins that ad -hoc utilizes:
- Standard JOIN – When the user joins two database tables, at least 1 row must exist in each table or the row will be eliminated from both tables.
- LEFT OUTER JOIN – Opposite of the Standard JOIN. The left table row will still be included in the report even if the joined table has no matching row. Joins and their importance when building reports are discussed in more detail in the Setup Report Forms and Filters section of this help file. Ad Hoc makes joining tables with either method as simple as checking a box.
Form Configuration
Because of the longitudinal nature of clinical trial data, it is very important to understand the relationship between the forms. Imagine a typical trial. The central entity is the subject. Case Report Form data is captured concerning the subject. How that CRF data relates to that subject is very important.
The form can basically have 3 types of relationships:
- One-to-One
- One-to-Many
- Many-to-Many
One-to-One Relationship
This is the simplest of all relationships. It means there is exactly one record per subject per form. A good example might be the demographics form. Normally, there is only a single demographics form to complete per subject. If the enrollment or registration data is the master subject record, then the demographics record can be joined right alongside it.
One-to-Many Relationship
Things get complicated when the user wants to relate data from two forms containing many records per subject. Fortunately, Report Builder makes this easy to configure. A good example of a "Many to Many" relationship might be comparing medications to adverse events. For example, show the user all subjects (one) that had at least one medication. The user also wants to see all the related adverse events to that medication. Let’s assume that a related Adverse Event may be an event that occurs within 7 days of a medication start date.
Form Configuration – Know Your Forms and Relationships
The figure below shows the Form Configuration Table. This table allows the user to define how the forms relate and how to query the data from each form.
Here are some basic rules when creating a report:
- All forms are related to the subject form unless otherwise stated.
- The sequence in which forms appear is determined by the order designated in the Form Configuration Table.
- If required is not checked for a form, the subject will appear in the report with empty columns if the given form does not exist for the subject. If required is checked for a form and the form does not exist, the subject will not appear in the report.
- The user relates one form to another and uses the Days Before and Days After to select which forms are related.
Reports can be simple or highly granular. The Report Builder easily handles both and allows for an amazing amount of flexibility when creating reports. Most reports are designed to be granular data sets that can be exported to a more industrial-sized reporting engine. This alleviates the statistician much of the burden of figuring out how the data model is designed.
After making the Field and Form selections for the report be sure to click Save Form Configuration.
Execute an Existing Report
Once the user has created and set up a report, the report can be executed from the Ad Hoc Reporting Page or the Report Setup page.
When viewing the Ad-Hoc Reporting page, locate the Execute link in the existing reports data table as shown in the figure below. Clicking the Execute link will execute the corresponding report.

The right column on the Setup Report Fields and Filters page contains the "Execute this Report" box as shown in the following figure. The "Execute This Report" link can be used to execute the selected report.

When either execute link is clicked, an Execute Report screen will be displayed.

The report output will display each field that was selected during the report setup as a column. All of the columns are sortable. Depending on the number of columns in the report, the scrollbar may need to be used to view all the columns in the report.
Below the report output is the report filters. The Report Filter(s) will vary depending on the field type. For example, a text field or numeric field will allow the user to filter by a range. All range filters are inclusive. This means that the filters check for the value being Greater Than or Equal To, or Less Than or Equal To, within the filter. A drop-down or radio field allows the user to filter based on an item in the list. Any field in the report or any of the forms that have been selected for the report can be a report filter.
To filter the report, select the desired filter settings and click Filter, located below the report filters. The report will be immediately filtered and displayed in the results data table according to the selections made. Empty filter settings will be ignored when filtering the report.
Because the Ad-Hoc Report Builder allows the user to join forms in many ways, it alleviates the burden of the database programming. Therefore, it is a very powerful tool for creating data sets for exporting. An Export to Excel link allows the user to export the entire report to an Excel data set.
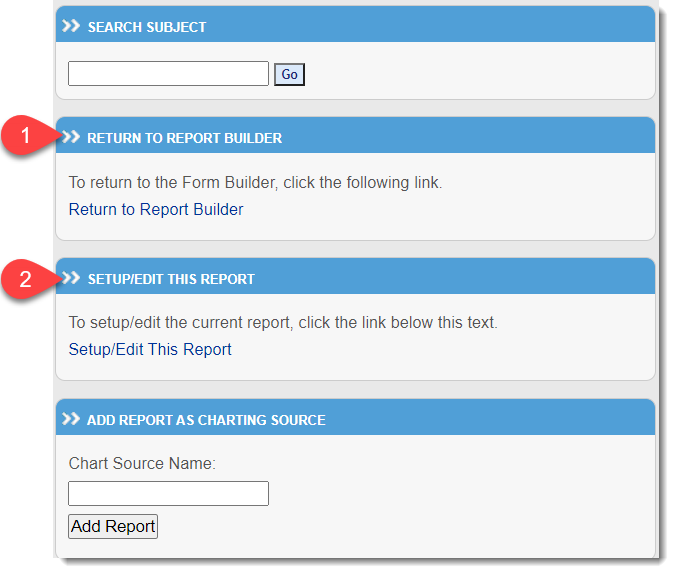
The links located in the right column can be used to navigate back to the Report Builder (Define Forms) or Report Setup (Define Fields and Filters).
Need more help?
 Please visit the Datatrak Contact Information page.
